Wednesday, August 28, 2013

Ball in a cup {imaginisce}


Yesterday on the Imaginisce blog I shared a tutorial on how to make a quick Ball in a Cup toy for your kiddos. My son had never heard of such a simple toy and was actually pretty curious about playing with it. 

It was funny to watch him try to get the hang of it and see how competitive he became trying to get the ball into the cup.


Head on over to the Imaginisce blog for my step-by-step tutorial and to see what the rest of the DT is sharing for kids crafts this week.

SUPPLIES: Imaginisce tools: i-Top, Clicut, Large Brad Daddy. Imaginisce paper: Outdoor Adventure (pattern paper, Sticker Icons, 3-D Stickers). The Twinery (denim), Beacon adhesive, a wooden pencil

Tuesday, August 27, 2013

Vacation mini album {pink paislee}


Hi! Today I am sharing a mini album that I made for the Pink Paislee blog. I am so glad that I had a chance to make this! It documents some of the family pictures we took while we were at the Cleveland Zoo a few weeks ago. None of the the animal pictures made it into this album — unless you count Nate and his bronze monkey. 


Here are pictures of the interior pages. I used Portfolio, Hope Chest, Luxe and Artisan Collections to make this album. The ribbon on the cover is from May Arts.


If you are wondering who these people are: On that middle page above we have (from left to right) my son, me, my mom, my sister and then in the "Captured" Photogram is my stepdad and my mom again.  


I love how the tabs from the Portfolio collection look along the edge, too. I should have thought to do a waterfall album so they stood out more, but I really do love the tabbed look of the finished product.

Thanks for stopping to see my mini album! Head on over to the Pink Paislee blog all week long for more mini album inspiration from some of the other members of the design team.

Friday, August 23, 2013

Our travels {whimsical twist}


Hi! Today is my first day to post over on the Whimsical Twist blog as a creative team member. I hope you'll join me over there and say hi! If you do, scroll on down to THIS POST, too, and fill out the Rafflecopter for your chance to win a $15 credit to the Whimsical Twist shop. All the new My Mind's Eye Chalk Studio is in the shop, so I have some ideas on what you can spend it on!


I was in Ohio in the beginning of August to visit family and the Travel Girl collection from October Afternoon is perfect for helping to document some of those photos. I also used some Carte Postale from Basic Grey and the Large Alpha Stickers from Fancy Pants for the OHIO lettering. 


Thanks for stopping to see my travel page! 

Wednesday, August 21, 2013

Shaker & Spring Cards {lily bee}


This week at Lily Bee we are focusing on unique techniques. Wednesdays are card days, so we are looking at something unique you can do with your cards. Leslie and I decided to think of the cards from a 3-D perspective and worked from there.

For my first card, I made a shaker card. I know it's really easy to just fill it with sequins and go from there, but I also added confetti using the same patterns of paper that are on the card itself. It helps to pull in the look when you shake it around. 


These adorable strawberries are from the Sweet Shoppe collection. Too cute, right?!

For my second card, I wanted to make a little springy card. Well, I don't have those springs manufactured specifically for your paper projects, so I stole one from a clicky pen I had and cut it down to fit. 


I took the pen spring and adhered it using really strong craft glue. A glue like Helmar or Beacon work well. One side of the spring was stuck to the back of the "celebrate today" circle and the other side was threaded through the "&" circle and also glued down to the label. 


If you flick the "celebrate you" circle, it bounces. You might lose an eye taking it out of the envelope though (lol).


Thanks for stopping here today to see my unique techniques for cards. Stop by the Lily Bee blog to see what Leslie did today as well as the rest of the great unique paper techniques all week long.

Tuesday, August 20, 2013

My Favorites {whimsical twist}


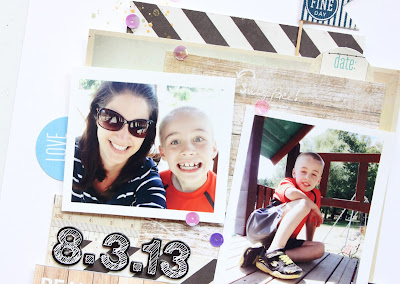
Yesterday on the Whimsical Twist blog some of us on the design team shared projects that showed off our favorites. I have a lot of faves on this page! First off, of course, is that boy. My favorite little person to hang out with and by far the light of my life. We had spent the day at Godfrey's Pond enjoying some sand on our toes and playground time. Good times!


I also used the Crate DIY Shop 6x6 paper pad. I love the woodgrain, stripes and bokeh effect sheet — so I used all 3 on this layout. The date is also in my favorite style Thickers.

The circle tags are from Elle's Studio Cameron collection. Another favorite! Of course, you can't ignore the sequins. Who doesn't love those?!


Hop on over to Whimsical Twist to see what else was shared yesterday. And if you feel like shopping, Whimsical Twist already has the shop stocked with new My Mind's Eye Chalkboard collection. The pre-order set up for new Crate Paper goodies, Fancy Pants and American Crafts is really easy, too. If you know you want some of the latest new releases, save your order with Kimmie — you'll be glad you did, and her shipping is really low, too. 

Have I mentioned here yet that she also has Silhouette mats and blades in stock? That's a bonus to add to any order! 

Thanks for stopping here today! There is a gift card up for grabs on the Whimsical Twist site. Stop by there to enter the Rafflecopter giveaway and play along.


Monday, August 19, 2013

Back To School {imaginisce}


It's Back To School time at Imaginisce and those of us on the DT have been sharing projects that inspire you to be crafty for the start of the school year. I made a crayon box and lunch box note for my son for his first day. 

The crayon box was cut on my Cameo using a digital cut file from SVG Cuts. I used Good Dog and Childhood Memories pattern papers and stickers from Imaginisce.


My son is starting second grade this year, and the second graders are in a different building than they were in for first and Kindergarten. To ease his transition to a new building, I thought a fun surprise with his favorite team might be helpful. 

I have Photoshop and Illustrator, so I was able to adjust Yankees logos I found online so they could be cut using the Silhouette software. I know I usually share my custom studio files with you here, but I'm afraid there might be a copyright infringement if I do this time. If I know you, send me a message on FB and I'll share the file with you privately because I trust you won't redistribute it.


Thanks for stopping to see my crayon box and lunch box note for back to school celebrations at Imaginisce. I had fun making this and know that Nate will just get a big kick out of having Yankees crayons.

Wednesday, August 14, 2013

Samantha Walker Creative Crafters Blog Hop {august}

Welcome to the Samantha Walker Creative Crafters Team Blog Hop! You should have come to my blog from Maya Oren-Dahan. If you found me first, make sure to start back at Samantha Walker's blog to catch all of the fun from the beginning.

This month's lucky winner will receivthe Pattern Basics Stamp Set


...and be eligible for the free SVG/Silhouette file for this month. Be sure to look extra closely at Step #4 below to learn how you can get this FREE SVG and Silhouette Studio file:
To enter, just leave a comment on Samantha's blog during Wednesday 8/14 until Sunday 8/18. The winner will be announced on Samantha's Facebook page on Monday 8/19.

For additional entries:
1. Receive an additional entry for commenting on each of the other blogs in the blog hop.
2. Go here and follow Samantha Walker's blog. 
3. Follow her on Facebook.
4. Sign up for an e-mail subscription to Samantha's blog and you will automatically receive a link to a free SVG cutting file that you can download and use on your personal electronic cutter. If you are already a subscriber, just enter in your information in the secure form on Samantha's blog!  The free files will be e-mailed early next week!


To receive the additional entries and get the free files, mention in your comment on Samantha's blog that you have done so! 

Now for this month's theme: Back To School!


Back to school is always a great time to try on new clothes for the cooler weather — and to make sure he isn't going to school with holes on the knees or ripped hems. I love that Nate wants to go into the dressing room himself now and his choosing his own style. 


The Giddy Up Boy collection from Carta Bella by Samantha Walker is perfect for this picture I had. Something about jeans means rugged and tough, and the Giddy Up collection helped me to illustrate that.


I created the cut file using a font I had and my Silhouette software for my Cameo. The background papers behind the lettering is from the Giddy Up Boy 6x6 paper pad.

Your next stop on the hop is Jamie Cripps... Click on the image below to keep on hopping!


Thanks for hopping along with us this month! 

Tuesday, August 13, 2013

Back to school cards {lily bee}


It's Back To School Week at Lily Bee and we are sharing cards that use the August sketch today on the Lily Bee blog. You can see the sketch at the end of this post, or head on over to the Lily Bee blog to see what the rest of the DT has been up to this month with Cindy's sketch.


To me, back to school means primary colors, numbers and a time to celebrate getting back into a routine. My son is in elementary school, so I love that I can still keep it pretty basic for him for back to school. I'll have to get more creative once he's older.

I think these cards would make a great lunchbox note or even a "hello" note for his bus driver or teacher.


I used the positives and the negatives from one cut for my numbers. Cut once = two cards! You can download my numbers studio file HERE if you would like to use it for yourself.


I used the 6x6 Tiny Tablets for all of the pattern papers. They work out great for cutting on the Cameo because you can fit them into each corner of the cutting mat. Move the 1, 2 and 3 into the corners and one cut gets you all 3 patterns done.


This is the sketch for August for Lily Bee. If you get a chance, use this sketch and share your work using Lily Bee products on the Lily Bee Flickr account. We'd love to see what you make!


Thanks for stopping by to see my cards today!

Supplies: Pinwheel (6x6 Tiny Tablet) and Sweet Shoppe (6x6 Tiny Tablet).

Friday, August 9, 2013

Sketch challenge {scrapbook circle}


It's time for this month's sketch at Scrapbook Circle! You can see the sketch below at the end of this post or you can go over to the Scrapbook Circle blog to get more inspiration and read the rules.


How fun are these cork stickers from Studio Calico that are in the Let's Go on an Adventure August kit? They do come printed like this — I did not stamp on them. 


I love these pictures of my son and this kit was perfect for making this page. He's really into the comic-style books at the library, and they have the best titles, don't they? This one was particularly fun because my nickname for Nate is Squish. We thought that meant he was destined to read this series. 


Here is the sketch for you! Head on over to the Scrapbook Circle blog to read more if you'd like to play along with us. You could win this camera strap from Blue Bird Chic just for playing along with us and using a Scrapbook Circle kit.


Thanks for stopping to see my layout today.

Wednesday, August 7, 2013

Project Life and a free studio download


For our summertime Project Life, I've been using the sleeves I picked up at Hobby Lobby last month. I got the Big Variety pack from Project Life and I love having all of the options for my pages.

I used some Fancy Pants, American Crafts papers and Pebbles chalkboard stickers for this page. And of course the Minion! 


For the back page, I used Cameron from Elle's Studio. I also used some Echo Park All About A Boy stickers. 


I cut my own card on the Cameo for the Lego Club die cut. I love that the camera also doubled as a Lego guy head. Do you see it? It's what I was going for, but if not, a camera works, too. 


I have saved the Lego Club Fun 4x6 card as a download for you. You can access it here as a studio file. Feel free to grab it and use it if you can. I know there are a lot of Lego kids out there!

Thanks for stopping here today!

Tuesday, August 6, 2013

Imaginisce and Core'dinations Blog Hop


Imaginisce and Core'dinations have partnered up this week to hop along and share in some inspiration this week. Today is the second day of our week-long hopping, so make sure to head to the Imaginisce or Core'dinations blogs to start over and see it all! 

You should have come to my blog from Jodi Wilton, if you didn't you can start over at the Aimee Kidd 's blog to start at the beginning.

This is the project I made using Core'dinations and Imaginisce  I used the Childhood Memories collection from Imaginisce and the Brights collection from Core'. While many people know Core' for their amazing thick papers that emboss well and cut perfectly, I wanted to highlight that they also hold paint and mist really well. Especially this white mist. Not all papers can hold this mist well, but I knew Core' would not disappoint.

I also cut the "tournament" title with Core' paper. Sometimes you can get tearing when cutting script fonts, but this worked out so well and cut perfectly.


Here is the hop order for today's posts:

Imaginisce Team:
Diana Fisher  (You are here!)

Core' Team:

Someone is going to win these fabulous prizes from Core'dinations and Imaginisce!


Make sure to leave comments along the way and we hope you like what you see this week! Thanks for stopping by here and all of the other blogs.

Hop on over to Suzanna Lee's blog next!